The materials used as abrasives are often obtained from mines or are created synthetically. The naturally mined abrasives include emery, quartz, corundum, diamond, and garnet. Synthetic abrasives however also include synthetic diamond, boron nitride, boron carbide, silicon carbide and alumina. In industrial applications, the abrasive materials are synthetic rather than natural so as to maintain supply and consistency in their properties. Diamond exists naturally but in general it is industrially produced; likewise, corundum occurs naturally but nowadays is more extensively manufactured from bauxite.
With the capability to reduce a surface by friction and rubbing, abrasives are utilized in a wide range of domestic, industrial, and technological applications, giving rise to a large variation in the particle size and shape of the abrasive materials. Abrasives find use in all facets of life from the sandpaper a carpenter uses to make the wood smoother to abrasive polishes that make an expensive shiny finish for a car. Even the abrasives in toothpaste used to clean and polish teeth must be just coarse enough to polish but not to abrade over a period of time. Teeth of greater sensitivity will require a lesser degree of abrasiveness.
Characteristics of abrasives
All these abrasive powders are made to remove materials and when choosing one, you need to consider their specific required characteristics. There are several significant factors which influence the behavior of an abrasive material, including hardness, self-sharpening ability, size and shape of the particles. Hardness is ascribed by values of the Mohs, Vickers or Knoop scales which will determine which material can scratch another when measured. The hardness of the abrasive has to be larger than the material being worked upon. Diamond represents the hardest material and has a value of 10, which is the maximum values on the most used, Mohs scale of hardness. On this scale most minerals are rated 7 or higher.


When abrasives are used for grinding wheels, the self- sharpening characteristic must be considered. It means that when the abrasive grains become blunt eventually after grinding, the grinding force also increases, the increased grinding force can make abrasive particles break up at which point the new angular grains come out, making the grinding material become sharp again.
Generally, an ideal abrasive material provides maximum resistance to point wear, yet fractures before serious dulling occurs, thereby meeting requirements of both stock removal and finishing.
Particle size is one of the primary parameters to affect the performance of abrasive products. Abrasives are either classified or crushed to a specified size, ranging from around 10 μm to 2 mm depending on the application.
Historically sieve screens, carefully made from metal threads of exact size and number per square inch, have been used to measure abrasives. The grit number represents the number of openings per linear inch that are in a sieve to classify the particle size. However, they do not measure the longest dimension only the second longest dimension, which is acceptable for the dulling stage where the particle is close to spherical, but not the most accurate dimension to measure if your ideal abrasive is irregular.
Choosing the optimum material with the appropriate size classes will help the users achieve professional results in both fabrication and finishing whether for metal, wood, or plastic applications.
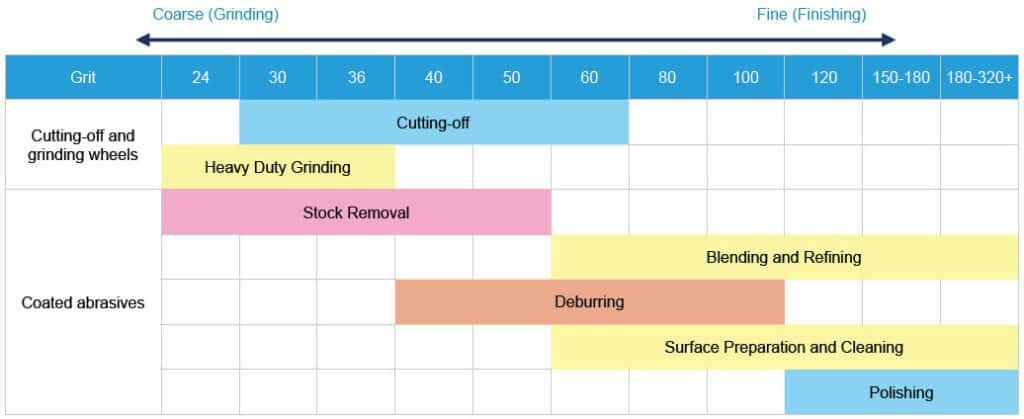
The table below shows typical grit grades for each stage of the application process. Grades are inversely proportional to grit size, so fine abrasives are higher grades.
As can be seen in Table 2, while no single abrasive can work in every application, there are many grades and types of abrasives available from which to choose the most appropriate optimum to fulfill your application.
Besides, there are various standards available to classify the size range of abrasives. One of the most common standards is called the FEPA grading system, which is the European standard of grit sizes. There are other different grading systems throughout the world including Japanese Standards – JIS, the US system ANSI and a coated abrasive system from US called CAMI. All FEPA grit sizes are preceded with the letter “F”, e.g. F220. Traditionally, sieves and sedimentation techniques had been employed to characterize the particle sizes of abrasives. Abrasives are split into 2 categories:macro-grits based on screen sizes(F4 to F220) and micro-grits based on sedimentation (F230 to F2000).
In addition to the particle size, another important performance factor of abrasive materials is the particle shape.
Historically abrasive powders were dispatched to their final use for various applications after being analyzed by a particle-size-only measuring system in order to keep the powder quality under control. Size-only systems will display sizes assuming the particles are round. They do not display shape information but only an equivalent spherical volume which is acceptable for low aspect ratio powders.
However, this is not adequate where the shape of the particles is directly associated with their performance. Figure 2 and 3 show the SEM images of zirconium oxide a commonly used abrasive, having sharp edges.
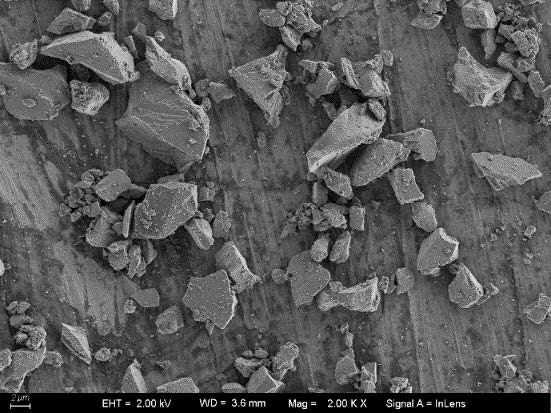
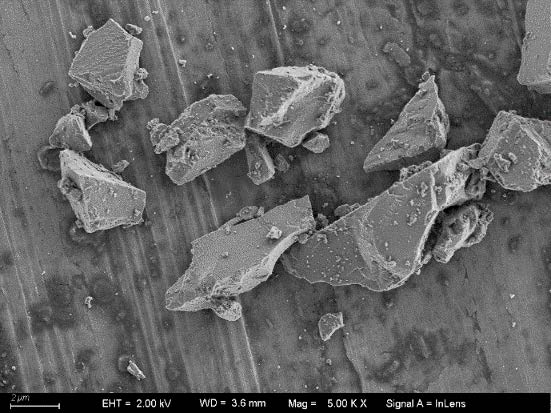
The shape of an abrasive may be angular, blocky, semi- round or spherical. An angular abrasive has sharp edges, which ensure the quickest cleaning rate when removing tightly adhering material or contamination from the substrate. The sharp edges of a hard, angular abrasive produce steep peaks and valleys in the anchor profile, thereby increasing the surface area and offering an excellent condition for the mechanical bonding of a coating.
These sharp edges can be seen in SEM images and dynamic image analysis (DIA) but not by sieving, sedimentation or traditional laser diffraction analysis. As we can imagine, if these particles were all smooth and round, the performance of removal would be poor. Round particles without cutting edges are employed to pound a surface, whilst particles with points and edges remove surface material on impact, by decreasing the surface area in contact with the work piece and therefore increasing the localized contact pressure.
Measurement technology
Traditional measurement method for abrasives is sieve analysis, which is limited by its ability to measure very small sizes and is also subject to shape bias. Currently laser diffraction is becoming more popular as a measurement technique than sieves and sedimentation, owing to its ability to cover almost all of the abrasive size ranges especially in the micro-grit range.
The Bettersizer S3 Plus can measure the exact particle size for both macro grits and micro grits. In fact, the measuring size range of the Bettersizer S3 Plus is 0.01 to 3500 μm due to the use of two technologies – laser diffraction and dynamic image analysis in combination.
The Bettersizer S3 Plus is not only a laser diffraction particle size analyzer but in addition, it is equipped with two high- speed CCD cameras (0.5X and 10X magnification) to capture images of the sample being measured. During the measurement, the particles dispersed in the medium are pumped through two measuring sampling cells. In the first sampling cell, short-wave laser light (532 nm) passes through the sample and is scattered depending on particle size, therefore allowing measurement of very small particles down to 10 nm. Simultaneously, the CCD cameras continuously take pictures through the second sampling cell to provide image analysis of particles in the range of 2 to 3500 µm easily covering the macro-grit size range.
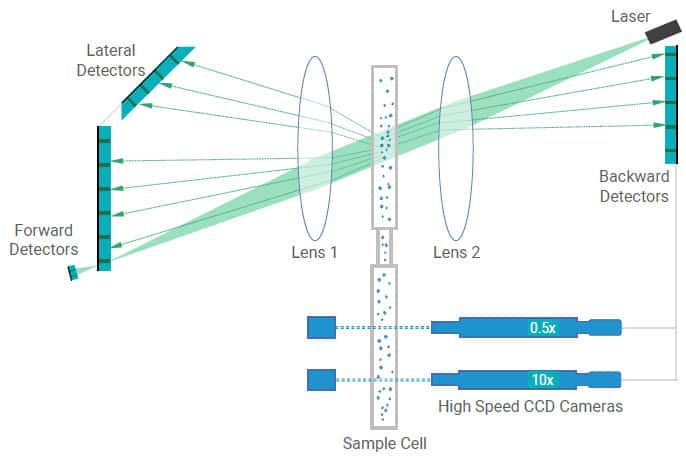
Both measurement methods of particle size distribution, the laser diffraction and dynamic image analysis have different features and benefits.
Laser diffraction has obvious advantages measuring small particles and wide distribution samples. As the particle size increases beyond 1 mm, accurate quantitative measurement of those large particles can become suspect. When the amount of large particles is of trace or low amounts, statistically there will not be enough particles to provide a totally reliable result. This is probably the only shortcoming of the laser diffraction technique other than measuring all particles as equivalent spheres.
This is where the Bettersizer S3 Plus excels because it does not have to rely on the laser diffraction to measure the small quantity of large particles and more importantly it measures shape in all its different dimensions by dynamic image analysis in addition.
Dynamic image analysis can clearly see and measure the parameters of each particle and also calculate its morphological values. For large particles, not only the size and morphology but also the absolute number of particles can be given, so the testing accuracy when measuring large particles is extremely high. The accuracy of dynamic image analysis decreases as the size of the particle becomes smaller, due to the limits of resolution and current ability of CCD cameras.
Consequently, in an innovative way, the Bettersizer S3 Plus combines the benefits of the two techniques to measure the full-size range down to 10 nm microns without any compromise and measure the shape as well down to 2 μm. Full advantage of improved measurement accuracy is gained by incorporating both methods into one system covering a wide size range and measuring the increasingly important determination of shape.
Providing size and shape information comprehensively
This example below shows a study on characterizing abrasives by using the measurement of laser diffraction with simultaneous dynamic image analysis.
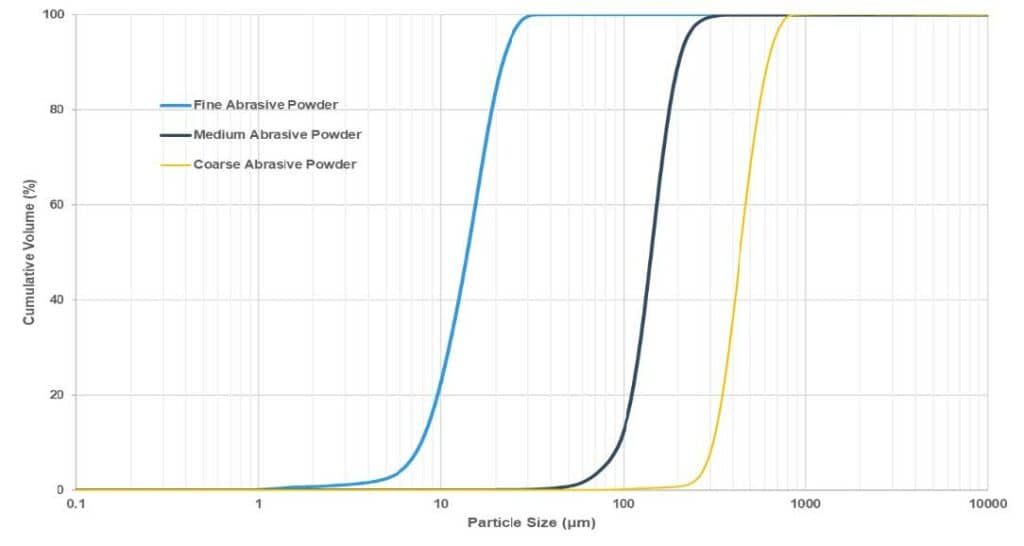
Three corundum abrasive powder samples:fine, medium and coarse were measured by the Bettersizer S3 Plus to characterize both the particle size and shape. Here we demonstrate how these powders differ in size as well as how they compare in their shape parameters.
As shown in the Figure 6, after the characterization of three different grits of abrasive powder samples, particle size results rank in the correct order as we would expect. It can be predicted that coarser particles will have a higher impact force and therefore remove the material surface quicker producing a heavier texture.
Interestingly, despite of the different sizes of the three abrasive powders, their circularity is significantly uniform, thus confirming the grinding process of the manufacturer for these abrasive powders is very well under control.
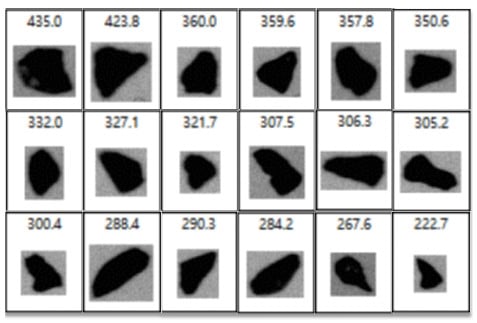
In addition, with dynamic image analysis technique based on counting, the Bettersizer S3 Plus is capable of easily identifying overly large or too spherical grains individually or indeed by viewing all the size and shape data parameters of all the particles creating number-based distribution and multiple other parameters. Figure 5 shows several camera images of a coarse abrasive powder captured by the Bettersizer S3 Plus in detail. The number shown above the image is the particular diameter selected by the user (Feret width or Feret length etc.) for each particle.
Size distribution is of primary interest, but a single size measurement is not adequate since the abrasive particles are not round and as is shown in Table 4, length and width are needed, as well as the circularity.

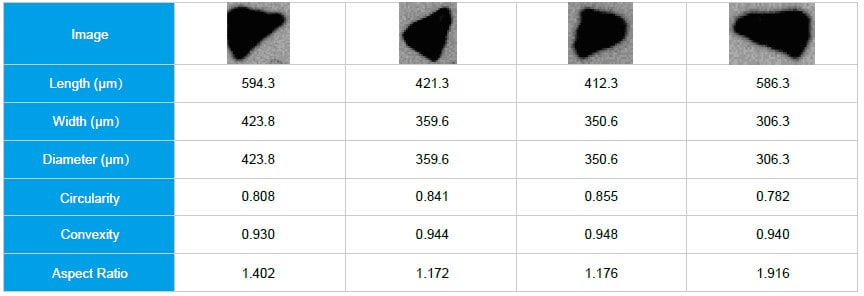
One of the primary shape parameters generated by the Bettersizer S3 Plus is circularity. The more spherical the particle, the closer its circularity approaches 1. The more elongated the particle, the lower its circularity. All of the selected shape parameters were able to offer information about abrasive morphology. Hence, measurements from the Bettersizer S3 Plus have enabled a more precise way of characterizing different particle shapes, and differences in shape between otherwise similar products.
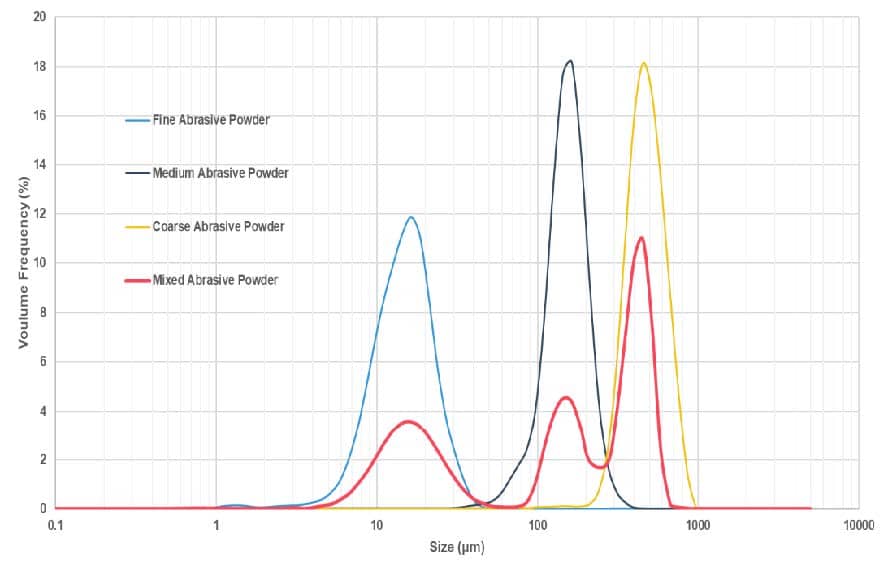
Finally, a new sample was mixed from fine, medium, and coarse samples for demonstration purposes. The particle size distribution of four samples including the mix one are shown in Figure 7. The analysis of that mixture indicates the presence of the three original materials as to be expected and consequently, the high-resolution capability of the combination technique is verified as well.
Identifying over-sized particles in fine powders
With the unique combination technique, the Bettersizer S3 Plus is capable of doing detailed statistical analysis of the size and shape of these particles as well as enable the user to see any large particle that may have been out of specification.
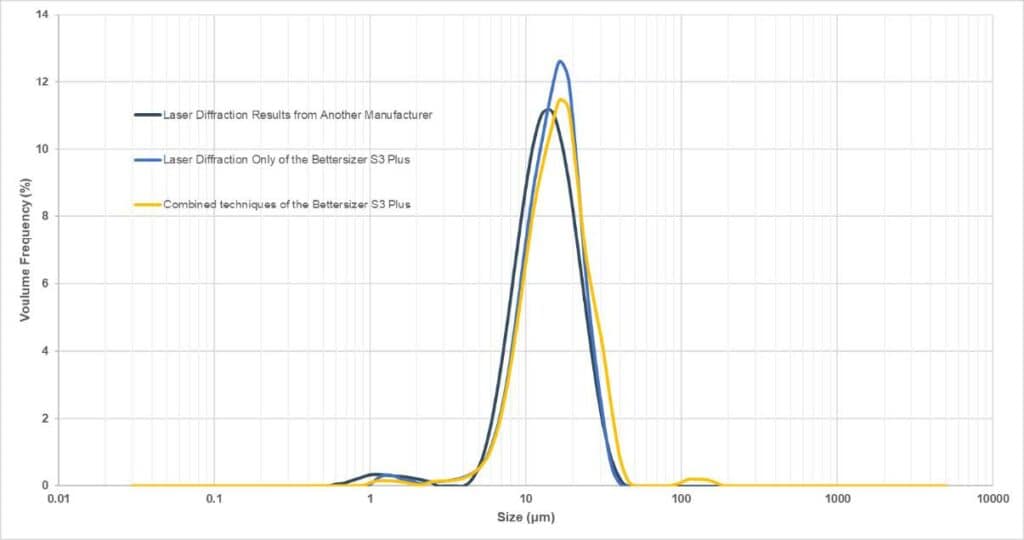
An off-specification powder product provided by an abrasive manufacturer is investigated and the results are shown in Figure 8.
Firstly, the particle size distribution of this abrasive product was measured by a popular laser diffraction analyzer of an international brand other than Bettersize. The result confirms the presence of small particles of around 1 μm, there by illustrating the over grinding of abrasives.
Next, the Bettersizer S3 Plus was utilized to investigate this abrasive powder. With the laser diffraction method alone, the main peak at around 14 μm and a small peak at 1 to 2 μm were indicated in Figure 8. Due to the feature of (DLOIOS: dual lens & oblique incidence optical system) the laser diffraction method of the Bettersizer S3 Plus is very sensitive to detecting these small particles.
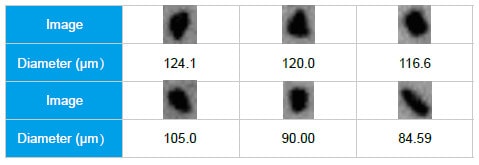
Finally, the abrasive powder was studied by the combination technique (laser diffraction & dynamic image analysis) of the Bettersizer S3 Plus. Interestingly, there is another small peak located besides the main peaks shown in Figure 8 at 120 μm. The overall result indicates the presence of unwanted ultrafine particles as well as large particles in this fine powder. In order to confirm the presence of oversized particles (under ground), images of large particles are therefore acquired and shown below in Table 5, proving that unwanted large particles exist in this off-specification abrasive.
This abrasive powder is thereby determined to be out of specification by the manufacturer for the reason of having not only ultrafine particles but also overly coarse particles. This experiment demonstrates that the Bettersizer S3 Plus with its unique design allows higher accuracy in the coarse range than conventional static light scattering devices and enables rapid identification of off-specification product.
Conclusions
Size is not enough to ensure the consistency of abrasives and it is well known within the abrasives industry that the shape of the particles is equally as significant a parameter to control.
As the Bettersizer S3 Plus utilizes the combination technique of both laser diffraction and dynamic image analysis, it can quantify the size and shape of all abrasive powders. In the first experiment, the critical size and shape information of different non-spherical abrasive powders are displayed comprehensively. In the second experiment, the critical size and shape information of different non-spherical abrasive powders are displayed comprehensively. In the second experiment, the presence of not only ultrafine particles as well as overly coarse particles in the off-specification abrasive is successfully detected owing to the wide measurement range and excellent sensitivity of the combination technique.
The Bettersizer S3 Plus has proven to be able to characterize the size and shape of the abrasives simultaneously and provide much more information than conventional laser diffraction analyzers. Its ability to detect small amounts (but important from QC perspective) of oversized grit particles separates its capabilities from those of standard laser-based particle si zing systems. They cannot detect small amounts of grit in the presence of good product whereas the Bettersizer S3 Plus’s dynamic image analysis technology can detect them easily thus making it a valuable tool for the abrasive industry in the 21st century.


